Picture this: you’ve accidentally damaged your beetle’s carefully crafted pupation chamber while checking out your beetle. Panic sets in as you realize the fragile pupa’s survival is now on the line. Don’t worry—there’s hope! In this guide, I’ll show you three simple and effective ways to create artificial pupation chambers to save your beetle pupae and ensure they emerge successfully into their adult form.
1. Semi-Artificial Pupation Chamber
If only part of the original pupation chamber is damaged, the semi-artificial approach is your best bet. This method works by preserving as much of the original chamber as possible.
Steps:
- Assess the Damage: Ensure the remaining chamber is free of mites and pests.
- Carefully Open the Chamber: Gently peel it apart like you would a hardboiled egg. Start at the damaged area until the opening is large enough to extract the pupa.
- Clean the Pupa: Remove any loose substrate from its body using a soft brush.
- Reposition the Pupa: Place the pupa back into the original chamber, ensuring minimal impact.
- Seal the Chamber: Cover the opening with a damp (but not dripping) paper towel. Avoid commercial wet wipes as they may contain harmful chemicals. Use multiple layers if the towel is too thin.
- Maintain Humidity: Lightly spray the paper towel with water every few days to keep it moist but not saturated. This helps prevent mold growth.
Why Choose This Method? The beetle itself optimized the chamber’s size and shape. This approach respects its natural instincts while providing additional support.
2. Foam Pupation Chamber
For larger beetle species like Goliath or Hercules beetles, foam pupation chambers are a sturdy and reusable option.
What You Need:
- Florist foam (the type used in flower arrangements)
- Compass or circle-drawing tool
- Spoon or carving tool
- A container with a lid
Steps:
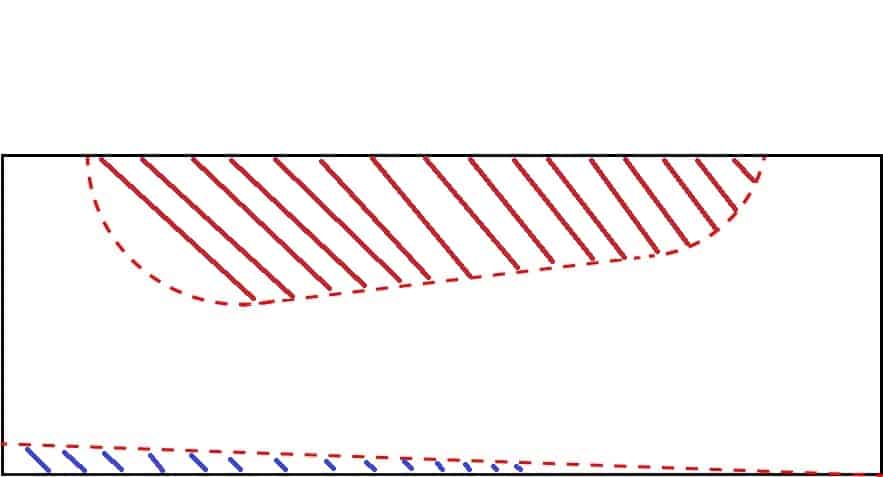
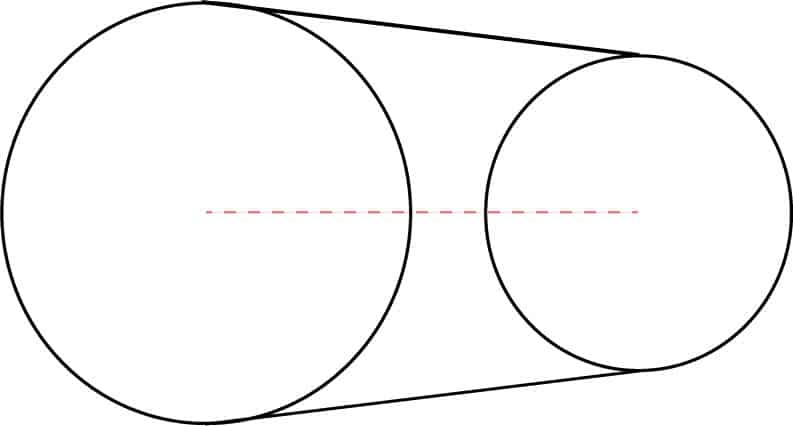
- Draw the Chamber: Use the compass to draw two circles on the foam—a larger one (2” radius) and a smaller one (1.5” radius). Space the centers 5-8 inches apart, depending on your beetle’s size. Refer to the below pictures.
- Carve It Out: Start from the center of each circle, working outward, and connect the two. Make the chamber slightly slanted (20-25° angle) by carving the smaller circle deeper than the larger one.
- Soak the Foam: Submerge the foam in cooled boiled water. Let it absorb water, then drain excess liquid.
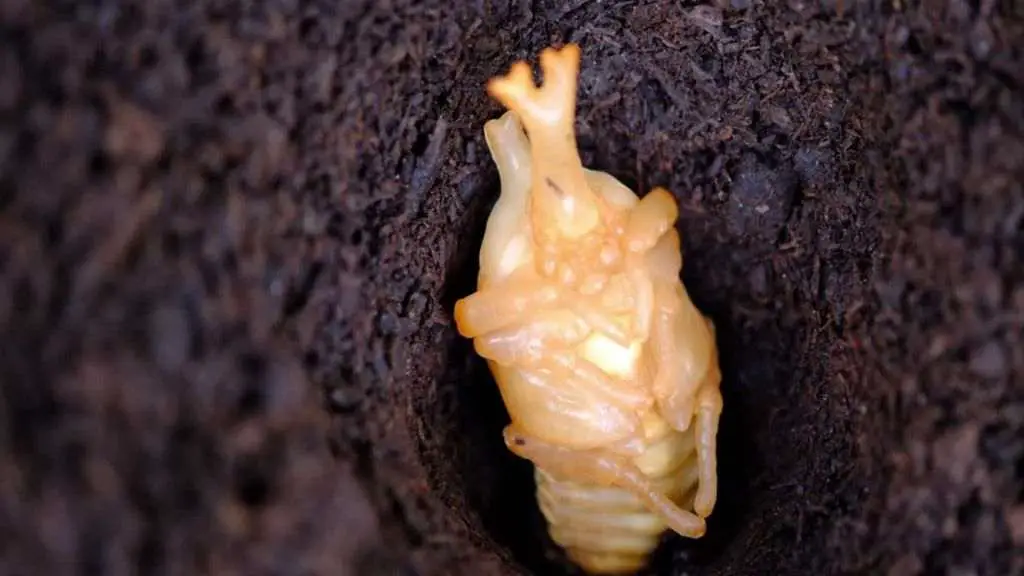
- Position the Pupa: Place the pupa inside, ensuring its abdomen faces downward and head upward at a slant.
- Enclose the Chamber: Put the foam in a container with ventilation holes and cover it with a lid.
- Maintain Moisture: Add a little water to the foam every few weeks to keep it damp but not dripping.
Pro Tip: Slanting the chamber supports pre-pupae transitioning into pupae more naturally.
3. Paper Towel Pupation Chamber
For smaller beetle species, the paper towel method is an easy and space-saving option.
Steps:
- Prepare the Container: Choose a small disposable plastic container.
- Layer the Towels: Lay 5-10 layers of paper towels on the bottom and sides of the container, leaving enough space for the pupa.
- Moisten the Towels: Spray the towels with cooled boiled water until damp but not dripping.
- Clean the Pupa: Gently brush off any substrate before placing the pupa in the chamber.
- Cover and Ventilate: Secure the lid with ventilation holes and monitor the humidity, adding water drops as needed to prevent drying.
Why Use This Method? It’s quick, cost-effective, and ideal for species that don’t require large chambers.
Caring for Artificial Pupation Chambers
No matter which chamber you choose, the following tips will help ensure the safety and success of your pupa:
- Protection from Predators: Keep the chamber in a pest-free, undisturbed location. Ensure the lid is secure to block ants or other insects.
- Temperature Regulation: Maintain species-specific temperatures to support healthy development.
- Moisture Control: Avoid over-saturating the chamber, as excessive moisture can lead to mold or rot. Never spray water directly onto the pupa.
- Darkness is Key: Place the chamber in a dark, quiet space to mimic natural conditions.
When to Use Artificial Pupation Chambers
You should create an artificial chamber if:
- The original pupation chamber is damaged (e.g., during substrate changes).
- Substrates become moldy or begin to rot.
- You intentionally open the chamber to observe the pupa (not recommended for beginners).
To avoid damaging the chamber unintentionally, always check for its presence before changing substrates. Gently rotate the housing to listen for hollow sounds or carefully dig layer by layer until you identify the chamber.
Remember: Natural pupation chambers are always preferred when intact. Artificial chambers increase the risk of failure if not correctly constructed.
Chamber Size and Shape Matter
The artificial chamber’s dimensions should closely match the beetle’s original creation:
- Too Small: The beetle may lack the space to emerge fully, leading to fatal outcomes.
- Too Large: The beetle might struggle to turn its body, increasing the chances of malformed wings or death.
Refer to the original chamber’s shape and orientation as much as possible. For beetles that construct vertical chambers, replicate the orientation accurately.
Final Thoughts
Creating artificial pupation chambers is a lifesaving skill for beetle enthusiasts. With patience and careful attention, you can help your beetles thrive even after accidental disruptions. Ready to give it a try?