If you are keeping stag beetles, you would come across the word kinshi. If you wonder what kinshi is and how to use it, you are at the right place. This guide will explain what is kinshi, how to make kinshi and how to use kinshi.
What is Kinshi?
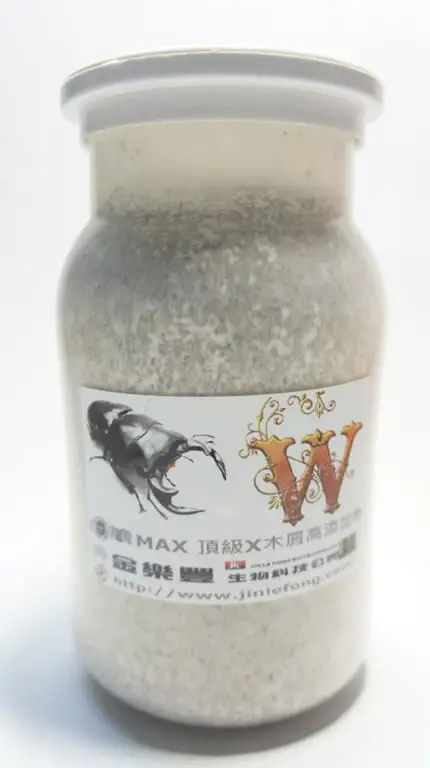
Kinshi is a Japanese term which literally means filaments of the fungi. It is basically nutrient-supplemented sawdust broken down by fungi. Many hobbyists in Asia use kinshi to grow stag beetles.
Why Use Kinshi?
The idea of using kinshi bottles to rear stag beetles seems to have originated from beetle hobbyists observing large stag beetle grubs living in fungi-colonized wood. They tried to replicate their observation artificially, which resulted in the invention of the kinshi bottle rearing method.
The fungi used in producing kinshi bottles break down the hardwood to produce the right combination of nutrients and byproducts for the stag beetles to strive. Hence, kinshi typically produce larger stag beetles than flake soil.
If your aim is to produce larger stag beetles, kinshi is the way to go. However, kinshi is harder to manage compared with flake soil.
For one, kinshi is a living creature. You need to take care of the kinshi on top of your grub. Secondly, kinshi is not as readily available as flake soil, and it is difficult to make your own kinshi. Lastly, it is a must to control the surrounding temperature if you use kinshi. If you use flake soil, temperature control is optional.
Remember, you can always use flake soil to grow stag beetles instead of kinshi.
Which Fungus to Use to Make Kinshi?
There are many types of fungi, and that includes the mushrooms, yeasts and molds. To make Kinshi, we use mushroom fungi.
Not all mushroom fungi are created equal though. Certain fungi are proven to work well in producing great kinshi, while certain fungi produce kinshi that can kill your beetles.
Fungi that are commonly used to make kinshi for stag beetles include Trametes versicolor (Turkey tail), Pleurotus ostreatus (pearl oyster), P. pulmonarius (Indian oyster), and P. cystidiosus (maple oyster).
Each fungus has its own characteristics. For instance, T. versicolor has a lower chance of growing mushrooms (you don’t want your kinshi to produce mushrooms); P. cystidiosus tolerates higher temperature; while P. ostreatus is prolific but may overwhelm weaker or younger grubs.
Certain stag beetles might consume only certain species of Kinshi. For instance, Allotopus and Mesotopus grubs feed only T. versicolor kinshi. Make sure you feed your stag beetles with the right Kinshi.
Generally, T. versicolor and Pleurotus spp are accepted by a wide range of stag beetles.
How to Make Kinshi?
To make kinshi at home, sterilize 1 gallon (~4 L) hardwood sawdust with a pressure cooker at 250 °F (121 °C) for 2 hours. Add mushroom spawn to the cooled sawdust and keep it at 68-77 °F (20-25 °C) for 2 months. Then, mix it with flour, multivitamins and bran. Leave it for another 2 weeks. Always wear gloves when making kinshi.
Making kinshi at home is not easy due to the risk of contamination by molds, but it is definitely doable. Continue reading to understand how this is done.
Preparation
You need the following tools and materials to make your own kinshi:
- Pressure cooker
- High temperature cooking bag
- 70% ethanol
- Hardwood sawdust
- Mushroom spawns
- Flour/bran/multivitamins
- Big transparent plastic bag
- Plastic bottle with large opening and plastic lid
- Nitrile gloves
- Chopstick
- Cotton wool
- Paperclip
Sterilize the Substrates
The materials and substrates that we used to prepare kinshi need to be sterilized to prevent the growth of unwanted molds. Otherwise, the mold can outgrow our mushroom spawns and trash our kinshi. We are going to use a pressure cooker to sterilize the substrates by heat.
Before sterilizing the substrates,we need to prepare the container. Make 2 ventilation holes on a cooking bag at around ¾ the height of the bag. The size of the holes should be around the diameter of your little finger. Stuff the holes with cotton wool.
Spores of some unwanted fungi might survive high temperatures. They are easier to kill after they germinate. To achieve better sterilization, we can induce germination of those spores by adding water to the substrates a day before sterilization.
Mix the sawdust with water in a 1 to 1 ratio. Put the moist sawdust into the high temperature cooking bag prepared earlier and compress it as much as possible.
Continue adding and compressing the sawdust until the bag is half full. Fold the opening of the cooking bag twice and secure it with a paperclip. Let the moist sawdust sit overnight.
On the next day, place the bag containing the sawdust into your pressure cooker. For each gallon (~4 L) of substrates in the bag, cook it for 2 hours at 250 °F (121 °C). For example, if your bag has 2 gallons of substrate, cook it for 4 hours. If you put 2 bags, each with 1 gallon of substrates, cook it for 2 hours. If you had to use a non-pressure cooker, you would need to double the cooking time.
After the sterilization is completed, let the substrates cool down. This will take a few hours.
Colonize the Substrates with Kinshi
After sterilizing the substrate, it’s time to introduce the mushroom spawn.
As mentioned earlier, molds can easily outgrow your kinshi. To avoid contamination by molds and other microorganisms when introducing the mushroom spawn, you will need to prepare a relatively clean environment. In the lab, this is usually done in a laminar flow cabinet, which we don’t have in our home.
The workaround is to create a small space with limited airflow to minimize airborne spores from contaminating our spawn or substrates and work within that space.
This can be done by working inside a big and transparent plastic bag. Put all the things required inside the big plastic bag and work on them with your hands in the plastic bag. The inner wall of that plastic bag should be sprayed with 70% ethanol and air dried prior to use.
Wipe a spoon with cotton wool soaked with 70% ethanol. Scoop a teaspoon of mushroom spawns which you have bought from a mushroom farmer and put it into the cooking bag containing sterilized substrates prepared earlier. Seal the cooking bag immediately after introducing the spawn. Remember, this step should be done inside the big sanitized plastic bag.
Keep the kinshi bag somewhere cool and away from light. The optimum temperature required varies depending on the species of mushroom that you are using. But generally, you need to keep the temperature between 68-77 °F (20-25 °C).
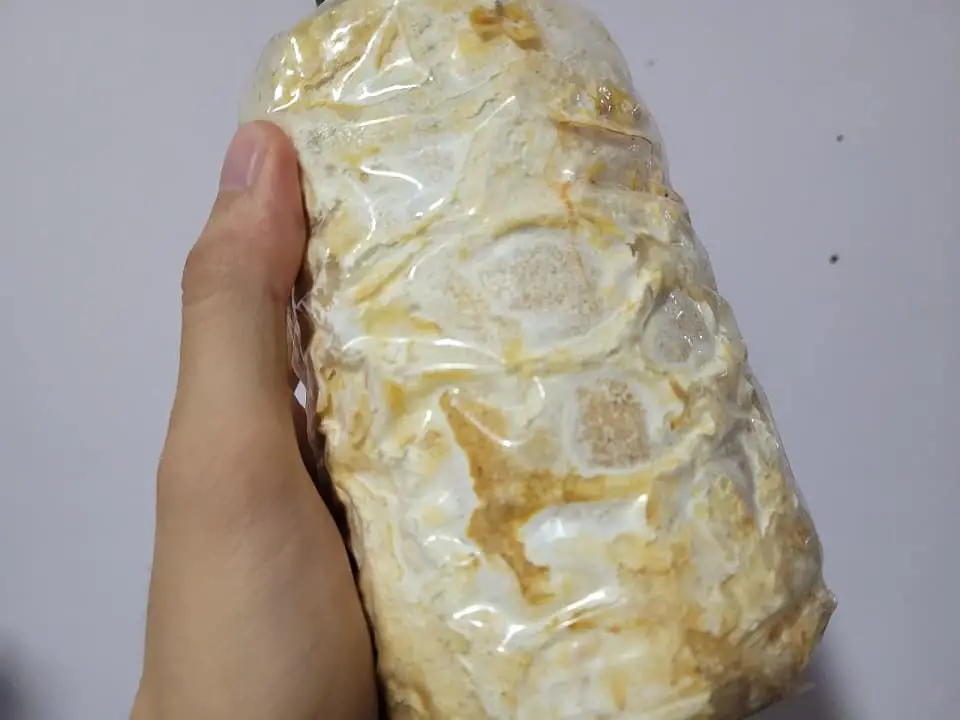
About a week after introducing the spawns, you should see kinshi started growing at the upper portion of the bag. The kinshi is white in color, and will slowly expand to the bottom of the bag. It takes about 2 months for the kinshi to fully colonize the substrates in the bag.
If you notice green, yellow or black spots on the substrates, you have a mold problem. Contamination has happened and the kinshi colonization is bound to fail. You will have to repeat the process again and focus more on sterilization and preventing contamination.
Note that the growth rate of the mushroom spawn deteriorates as it ages. Keeping the unused mushroom spawn in the fridge can prolong its lifespan.
Adding Nutrients into the Kinshi
Once the whole bag is fully colonized by the kinshi (fully white in color), you can add in some nutrients to boost the growth of the grubs that consume the kinshi later on.
The type of nutrients used include flour, bran, multivitamins, monosodium glutamate, whey etc. The exact nutrients and the amount used is considered a trade secret. As a general rule of thumb, the amount of the additives used should not be more than 5% of the sawdust which you initially used to create the kinshi.
Sterilize a tub using 70% ethanol and let it air-dry. Pour the kinshi into the tub and break it using your hands, with gloves on. Pour in the nutrient additives and mix them thoroughly. Once you have done that, transfer the mixture into a pre-sterilized bottle and compress it until it is 80% full. Using a sterilized chopstick, make 3 vertical holes through the substrates.
Make 2 holes on the bottle lid. The diameter of the holes should be around the diameter of your little finger. Stuff the holes with cotton wool and cover the bottle with the modified lid.
Note that this bottle will be used to house your grubs. Make sure the opening is big enough to put in and take out your grub/beetle.
You don’t need to sterilize the kinshi again because it has already established itself on the substrates. There are very limited rooms for molds to grow and compete with the established kinshi.
Keep the kinshi bottle away from direct lighting at 68-77 °F (20-25 °C) for 2 weeks. The kinshi will quickly recolonize the substrates by then. You can then use your kinshi to feed your stag beetle grub.
How to Use Kinshi?
To use the kinshi, open up the cover and insert some old substrates which the grub was living in. It can be the old kinshi or flake soil. Put the grub onto the old substrates and it will start digging into the kinshi. Kinshi should be kept between 68-77 °F (20-25 °C).
Kinshi can be used after it has fully colonized the substrates in the bottle. The whole kinshi bottle is white in color if it is fully colonized, since the substrates are fully coated with the kinshi.
Do not use the kinshi bottle if only half of it is white. This is because the growing kinshi will create heat and other byproducts, which may kill your grub.
Once the kinshi has fully colonized the substrates and there is no more space for the kinshi to expand, its metabolism slows down. That is when it is safe for your beetle to consume.
Replace the kinshi once 70% of it has been consumed or 3 months after the grub was introduced, whichever comes first. By then, the kinshi bottle would have started to lose moisture and grow molds.
At any point of time, change the kinshi if you notice significant formation of molds. Otherwise, the molds can kill your grub.
Temperature Control
Temperature control is very important when making, using and storing kinshi. Depending on species, kinshi grows best between 68-77 °F (20-25 °C). Hence, you want to keep the temperature consistently within the optimum range when growing your kinshi and rearing your beetles.
Obviously, we want the kinshi to grow faster so that we can use it as soon as possible. At the same time, growing faster also means a higher chance of successful colonization. It is more difficult for the molds to compete with the kinshi if the kinshi grows stronger and faster.
Another reason to control temperature is to prevent the kinshi from fruiting, or growing mushrooms. Kinshi can grow mushrooms if the temperature increases. The mushroom will take away the nutrients, which makes your kinshi less ideal for growing beetles. If you see mushrooms growing from your kinshi, remove it as soon as possible.
Kinshi can be stored for up to 6 months if kept between 68-77 °F (20-25 °C).
Additional Information
Always wear gloves when making kinshi to reduce the chance of contaminating the kinshi. With your gloves on, spray some ethanol on the gloves and rub them to sterilize the gloves.
The quality of kinshi from a reputable supplier is most likely better than what we can make at home because of species of kinshi (potentially genetically modified for best performance), higher level of sterilization, and formulation of the additives used.
If kinshi is readily available at where you live and you don’t have the resources or time to experiment with different combinations of “recipes”, it’s best to buy instead of making your own kinshi.
If you buy kinshi that is stored in plastic bag, you need to put the kinshi bag into another container when rearing your grub. This is to prevent your grub from running away if it bites through the plastic bag.